By Andrew Cox

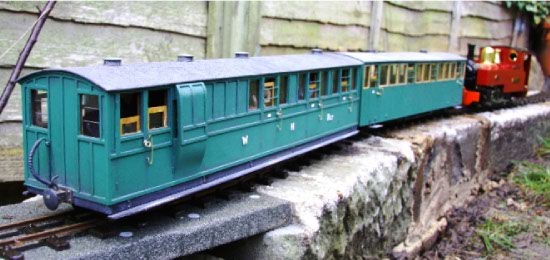
In 2010 an extension to our home necessitated the dismantling of my old garden railway. Coinciding as it did with a growing interest in the old Welsh Highland Railway, a desire to move into the realm of scratchbuilding rolling stock, and even Accucraft’s release of a War Department Baldwin loco, the result was inevitable – my West Kent Light Railway found itself slowly transforming into the Windmill Hill Welsh Highland.
Having constructed a rake of Ffestiniog four-wheelers as my first scratchbuilding project, I decided to try something a little larger. The 1907-built Pickering brake composites that the Welsh Highland inherited from the former North Wales Narrow Gauge Railways were attractive and versatile vehicles that sometimes formed a complete train in their own right – the perfect choice!
The model’s construction follows fairly conventional lines, and is similar in many ways to Lewis Williams’ lovely model of a Pickering brake in its colourful later years featured in 16mm Today. Via the printed page and the internet, I’ve pinched ideas and sought advice from many fellow 16-millers – my sincere thanks to all of them. Having been encouraged to have a go at scratchbuilding by their writing, I’ve jotted down my own experiences here in hope that perhaps others might be similarly persuaded.
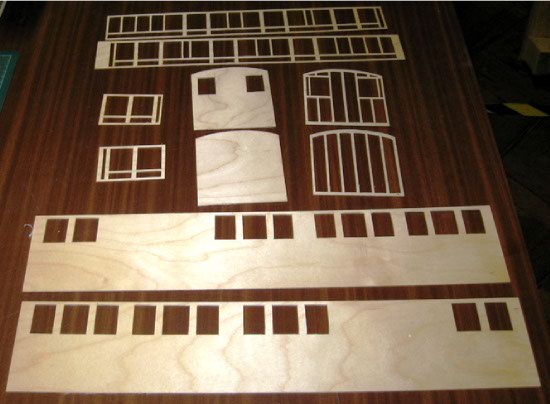
The main body parts were cut from 1.5mm plywood using 7mm Association drawings photocopied up to the correct scale and applied to the wood using repositionable mount spray from an art shop. These drawings are fine as published, but the lines become a little fuzzy and indistinct when enlarged and so careful consideration is required before applying a Stanley knife. As it is I’m not terribly good at either measuring or cutting accurately and so nothing on my models ends up entirely square or parallel in any case. I like to think it adds a human touch that can’t be recreated by the precision of a laser cutter, but perhaps that’s just an excuse for poor workmanship!

The drawings don’t show certain details of the carriages in their later cut-down form and seem to portray the end windows incorrectly for that period too. I compared with other drawings (from JIC Boyd’s books and Peter Johnson’s first Welsh Highland history) and old photographs and managed to sort those details, but unfortunately didn’t spot certain other inaccuracies until it was too late. I’m sure there are others I didn’t spot too.
Cutting all those windows took a lot of both patience and knife blades, but it made productive use of lunchtimes at work where I’ve established a very basic workshop in a little-used store room adjacent to my office. Beading was cut out as a single fret from 1mm ply using the same technique as the main body, another time-consuming business. A month or so of lunchtimes produced a kit of parts to be taken home for assembly.
While all that had been going on at work, at home I’d been preparing the running gear. As with much of my rolling stock I’ve used old Big Big Train equipment, in this case from their version of the British Rail Mark 2 carriage. Big Big chassis are available relatively cheaply and run well even on indifferently laid track, and in this case the bogies also happen to have the correct wheel diameter and wheelbase. The detail is all wrong of course, but it’s barely visible beneath the floor and behind the foot boards.
The floor and compartment partitions are cut from over-scale thickness plywood in order to add strength and weight, reasoning that in this vehicle the extra thickness would not be very visible. I didn’t quite get away with it because I didn’t compensate for the thickness of the floor sufficiently when adding the seats, which came out a little on the high side, but it’s not too apparent.
The basic carriage was glued together, the beading frets added, and any gaps then filled and sanded as necessary. The guard’s lookout duckets were built next, a fiddly but pleasing job again aided by the plentiful use of filler and sandpaper. The curved outer skin of the duckets are from 0.5mm ply, which were clamped in place while the glue set in order to hold the required curve – fortunately the curves at the top of the duckets are not too severe on this carriage. A coat of Liberon sanding sealer and a thorough sanding down completed the basic body shell by ensuring that the prominent grain pattern wouldn’t show through the final paint finish.

The body shell was completed with a little underframe detail, footboards, Brandbright couplings, and vacuum brake pipes. I formed the latter from a single length of flexible garden wire, using split pins to hold it in place on the body and net curtain wire to represent the flexible hoses. The pipework on the real thing was rather crudely done when the carriages were modified for through working onto the Ffestiniog – scratchbuilding the pipes rather than using readymade castings has enabled me to recreate this distinctive look.. It’s very cheap too!

An initial coat of primer was added and sanded down before I added representations of door hinges and window bars. A further coat of primer, carefully sanded around these details prepared the way for top-coats of Revell enamel, applied by brush. Plastic lettering from the Slaters range and DJB transfers finished the job, ready for a light weathering. A first attempt using a wash of dirty thinners lifted too much colour from the original paintwork, so I repainted the affected area and dry-brushed a little grime onto the outside instead. The footboards were sanded a little to replicate the effects of wear from passengers’ feet and the whole carriage was sprayed with matt varnish. Brandbright door handles and long grab rails bent up from brass wire finished off the exterior.

Moving on to the interior, droplights were constructed using three layers of 0.5mm ply – a pane of clear plastic of the same thickness was added once they’d been varnished. It’s a time consuming method, but it does allow the droplights to be positioned as desired. The other glazing was cut from 1.5 mm clear plastic, with the edges painted to represent the inside of the carriage doors where they abut the droplights, and the whole lot was glued into place. An interior layer of varnished 0.5mm ply was added on top of the glazing to neaten the interior. Gluing this layer into place proved a little messier than I’d hoped and this is something I’ll do differently in future, using the inner wall to create a pocket for the glazing instead.
Basic representations of the seating were glued into place, slatted in the third class and upholstered (with spongey kitchen cloth) in the first, and the rest of the varnishing was undertaken. Figures picked up second-hand from a variety of sources were butchered to suit their new roles and then handed over to my children for painting. They did a lovely job, with just a little help from me when it came to the tricky bits. I didn’t add loads of detail, but couldn’t resist some luggage and a brake wheel in the guard’s compartment, pictures (from a postcard reproduction of an old railway poster) in the first class, and leather droplight straps cut from an old shoe. The interior is lit with Ikea Christmas tree lights, powered by a battery box beneath the floor.

A roof of individual wooden strips covered with cotton sheet and topped with Brandbright fittings finished the carriage, which now awaits a railway to run on. The rebuilding of my line is underway, and I hope it won’t be too long before the Pickering brake can take its place in Welsh Highland trains trundling around the garden. To keep it company a model of the buffet car is almost complete, representations of the Gladstone car and a Hudson toastrack are in the works, and others are planned – if you’re interested visit www.wklr.webs.com to keep up with the latest progress.
Andrew Cox